

Microsoft is integrating a plethora of generative AI-powered functionalities into Windows 11, and it’s not solely centered on the Copilot assistant. The company has initiated the process of enhancing several apps with fresh AI capabilities, including Paint, Clipchamp, Snipping Tool, and Photos. The release of the Windows 11 2023 update, referred to as 23H2, transpired on October 31, extending access to Copilot and other AI features.
These AI updates from Microsoft are being gradually rolled out, so you might not have access to all of them just yet. Nevertheless, it’s beneficial to have an understanding of the potential uses of these innovative tools. Below, you’ll find guidance on harnessing the AI features within each app.
How to use Paint in Windows 11
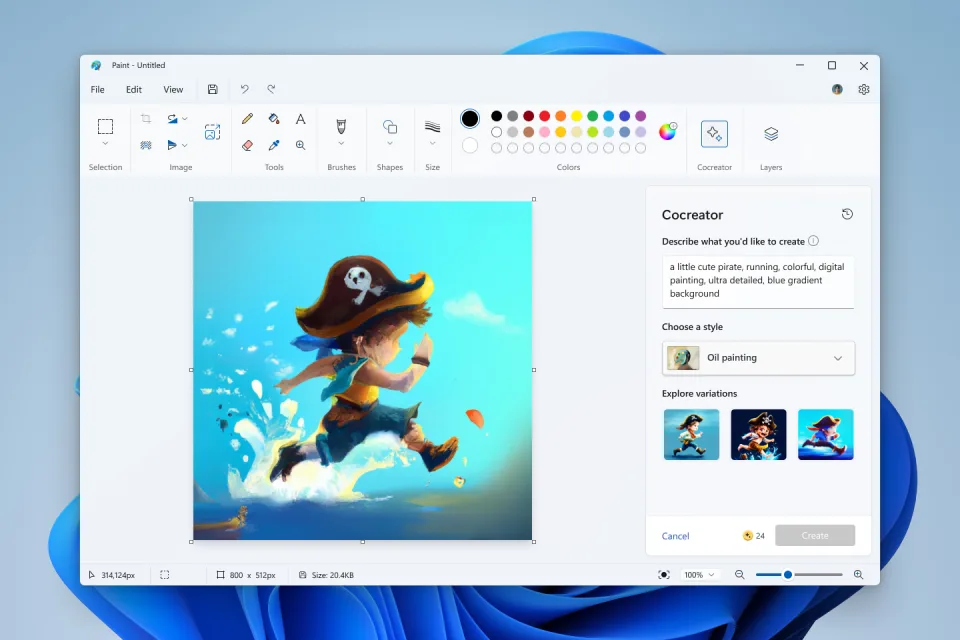
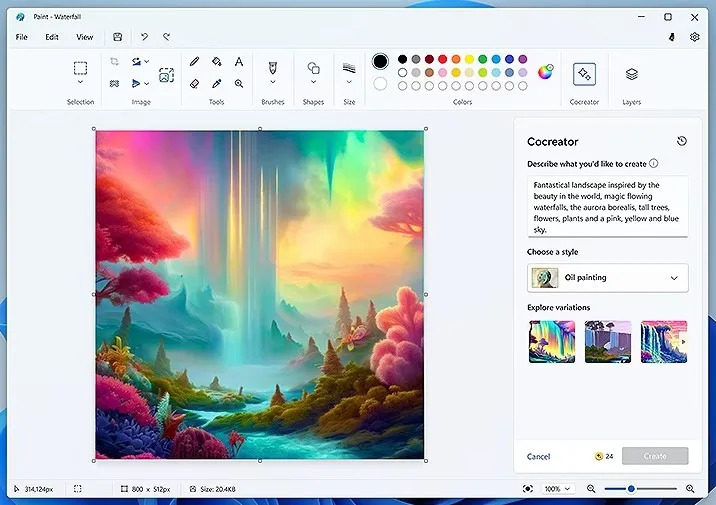
A AI-enhanced version of Paint, featuring generative AI capabilities, is being introduced to Windows 11 users. Microsoft’s Paint Cocreator leverages the DALL-E model to facilitate the creation of images based on text descriptions. This feature can conjure up a wide array of visual concepts, limited only by reason.
Getting started with Cocreator is a straightforward process, provided you have access to it. Initially, Cocreator is accessible in the US, UK, France, Australia, Canada, Italy, and Germany. Currently, only prompts in English are supported. To begin using Cocreator, you’ll need to join a waitlist, which can be done from the Cocreator side panel. You’ll receive an email notification when you gain access to this feature.
To utilize Cocreator, signing in with your Microsoft account is necessary. This is due to the fact that Cocreator operates on a cloud-based service, requiring authentication and authorization. Additionally, signing in is essential to access credits, which are needed to generate images using DALL-E. Upon joining Cocreator, you’ll receive an initial allocation of 50 credits, each allowing you to create one image.
How to install Paint on Microsoft Windows 11
If you haven’t already installed Paint, you can acquire it from the Microsoft Store. Once you have it installed, open Paint and locate the Cocreator icon on the toolbar. From there, you can input a detailed description of the image you wish the AI to create. Microsoft advises providing as much detail as possible to ensure the generated results align with your vision.
After entering the text, select the style you prefer for your image. Then, simply click the “Create” button.
Cocreator will subsequently produce three distinct images based on your text input and chosen style. You can select one of these images to add it to the Paint canvas, allowing you to begin making modifications.
Furthermore, Paint now offers support for background removal and layers. Using AI technology, you can isolate an element, such as an object or a person, and effortlessly eliminate the background with a single click. Additionally, you have the capability to edit individual layers without affecting the remainder of the image.
How to use video auto composition with Clipchamp on Windows 11
Stitching together footage in the video-editing tool Clipchamp is becoming more user-friendly. The application will assist users by providing automated suggestions for aspects like scene transitions, edits, and storytelling. However, the feature that may be most valuable to many users is the auto-compose function, which is accessible on the web and within the Microsoft Clipchamp desktop application.
According to Microsoft, the media you upload to Clipchamp is not used for training AI models, and all processing occurs within the app or browser. The app’s AI video editor, designed for all users, can autonomously create slideshows, montage videos, and short 1080p videos based on the photos and videos you include.
If the initial video suggested by Clipchamp doesn’t meet your expectations, you have the option to explore alternative versions “instantly,” as the app is capable of generating multiple videos for you. Microsoft also notes that the auto-compose feature may be valuable to professional video editors, as it can swiftly generate numerous unique videos in just a matter of minutes.

Upon logging into Clipchamp, locate and click the “Create a video with AI” button, prominently featured on the main page. After assigning a working title to your project, you can upload media by clicking the “Click to add or drag and drop” button. Alternatively, you have the option to effortlessly drag and drop videos and photos directly into the media interface.
Once you have completed the media addition, click the “Get started” button. Subsequently, you will guide the AI in understanding your desired style and aesthetics. Available styles include options like elegant, vibrant, and bold. You can express your preferences using the thumbs-up and thumbs-down buttons. Alternatively, you can opt for Clipchamp to make the selection for you by choosing the “Choose for me” option. When you’re prepared to proceed to the next stage, simply click the “Next” button.

Clipchamp will propose a video duration based on its assessment of the optimal combination of your media elements. You will have the flexibility to customize both the video length and the aspect ratio before proceeding. Prior to leaving this screen, you can preview the video by clicking the play button.
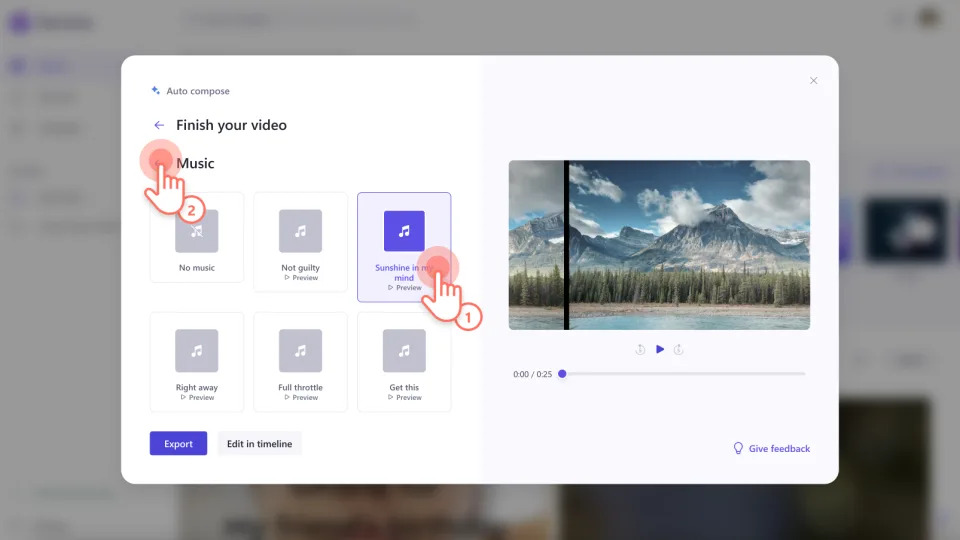
Moving on to the “Finish your video” screen, you will have the option to modify the background music should you prefer a different track than the one chosen by the AI. By selecting the music button, you can switch the tune. Once more, you will have the opportunity to preview both your video and the accompanying audio track. If you find the video unsatisfactory, you can request an alternative version by clicking on “Create a new version.”
If you’re satisfied with the video created by Clipchamp, you’re essentially ready to finalize the process. Click the “Export” button to save the video. From the export page, you have the option to directly share your video on platforms such as YouTube and TikTok or save a copy to your OneDrive storage.
Once the AI has completed the video, you can continue to customize it further within Clipchamp. By clicking the “Edit in timeline” button, you gain the ability to incorporate elements like stickers, captions, animated text, and audio files.
Furthermore, you can enhance your video using AI features, including a text-to-speech voiceover function and automatically generated subtitles. The speaker coach tool is designed to provide real-time feedback on your camera recordings, assisting in enhancing your speaking skills and video presentations.
Many of Clipchamp’s features are accessible at no cost. However, for videos in 4K resolution and access to premium tools, you’ll need to subscribe to the essentials plan, priced at $12 per month or $120 per year.
How to use Snipping Tool’s AI features
The Snipping Tool stands out as one of Windows 11’s most valuable features, offering effortless screen capture and sharing capabilities. Additionally, the app incorporates AI functions that offer numerous advantages.
For instance, the app provides support for text recognition. When using the Snipping Tool to capture a screenshot containing text, you can access the Text Actions button. Initially, you’ll encounter two primary choices. You can either copy all the text and subsequently paste it into another application.
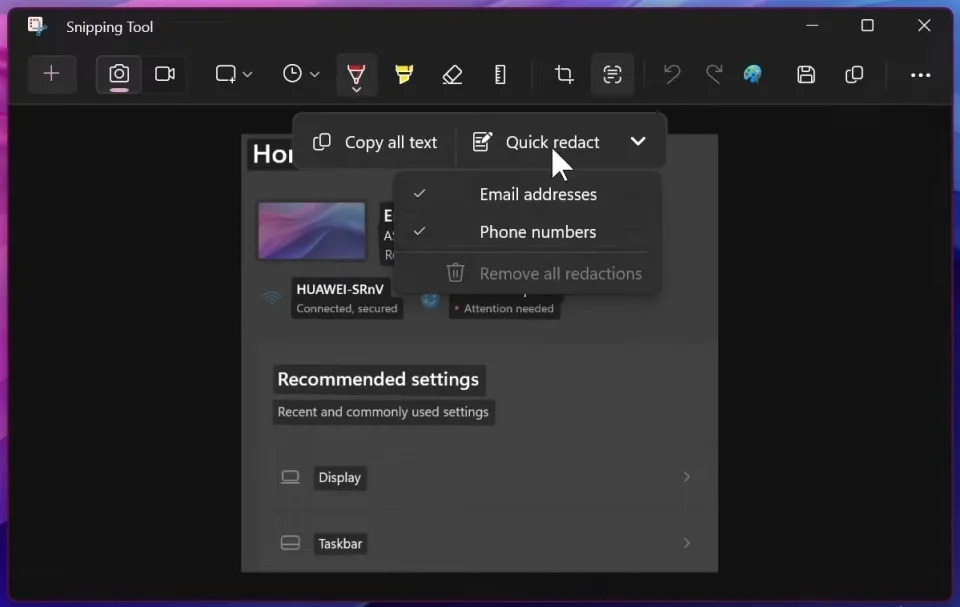
Alternatively, you can efficiently redact sensitive information. The tool is designed to identify email addresses and phone numbers, allowing you to rapidly obscure them. This feature can spare you the manual task of concealing text, such as in an application like Paint.
The Snipping Tool also seamlessly integrates with Copilot. As demonstrated in a Windows 11 promotional video, you can paste content that you’ve captured with the tool into Copilot. From there, you can perform actions like instructing the assistant to remove the image’s background.
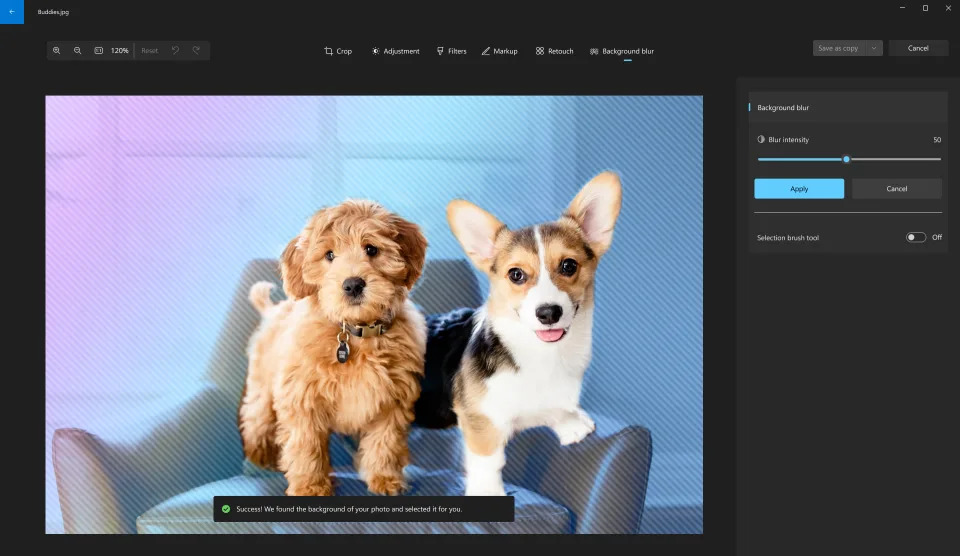
How to use Background Blur in Windows 11’s Photos app
The Windows 11 Photos app boasts several valuable AI features. These include an improved search function for images stored in OneDrive accounts, making it simpler to locate photos based on their content or the location where they were taken.
Additionally, AI has enhanced the app’s editing capabilities. One of the most user-friendly and practical tools is the self-explanatory “Background Blur” (similar to a feature found in Paint 3D). This feature allows the subject of your photo to stand out prominently. The AI distinguishes between the background and the subject, and to safeguard your data, this separation process occurs locally on your device rather than in the cloud.
To utilize the Background Blur function, begin by selecting the image you wish to edit and open it in the Photos app. Click on “Edit image” at the top of the screen and select “Background Blur.” You will then have several options at your disposal. You can promptly enable the blur effect, fine-tune the blur intensity before applying it, or exercise more precise control by activating the “Selection brush tool.”
If you opt for the Selection brush tool, you can manually specify additional areas of the image for the AI to blur. Conversely, you can deselect portions of the image that you prefer not to be blurred. You will also be able to adjust the brush size for finer control and modify the brush’s softness to intensify or diminish the blur effect.