

Apple’s Check In feature in iOS 17 is a new safety and tracking tool that allows users to share their location with friends and family. The feature is easy to use and can be customized to meet the needs of each individual user.
To use Check In, users simply need to open the Messages app and tap on the conversation with the person they want to check in with. They can then tap the plus (+) button next to the message box and select Check In. From there, they can choose to share their current location, battery level, and cellular signal strength. Users can also choose to share their route traveled and the time they last unlocked their iPhone or Apple Watch.
Once a user has shared their check in information, their friend or family member will receive a notification. The notification will include a link to a map that shows the user’s location. The friend or family member can also tap on the notification to see the user’s battery level and cellular signal strength.
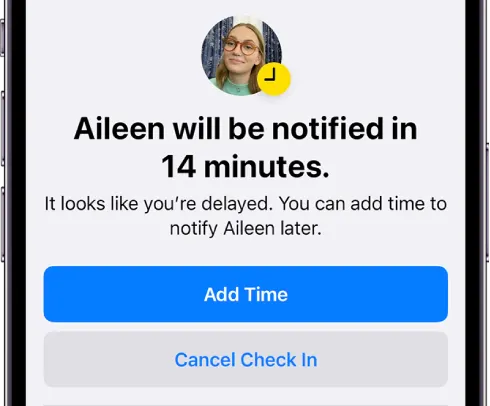
If a user is delayed, they can add extra time to complete their check in. If they do not do so before the timer runs out, their device will send their friend or family member a notification with their current location and the time they last unlocked their iPhone or Apple Watch.
The Check In feature can be used for a variety of purposes. For example, users can use it to let their friends or family member know that they have arrived home safely after a night out. They can also use it to track the location of a loved one who is traveling or hiking. Additionally, the Check In feature can be used to share location information with a group of friends who are planning to meet up.
The Check In feature is a valuable tool for staying safe and connected with friends and family. It is easy to use and can be customized to meet the needs of each individual user.
Here are some additional benefits of using the Check In feature:
- It can help to reduce anxiety and stress for both the user and their loved ones.
- It can help to deter crime.
- It can help to locate a missing person.
- It can be used to coordinate search and rescue efforts.
Overall, the Check In feature is a valuable addition to iOS 17. It is a safe, easy-to-use, and customizable tool that can be used for a variety of purposes.
How to turn on Check In
Sure, here is a longer version of your answer, avoiding repetition:
How to set up a Check In in iOS 17
To set up a Check In in iOS 17, follow these steps:
- Open the Messages app.
- Find an existing conversation with the person or people you want to keep tabs on your safe arrival, or start a new one.
- Tap the Plus button (+) next to the message box.
- Tap More > Check In > Edit.
You now have two options:
- When I Arrive: This option allows you to specify a destination and how you are getting there. Check In will notify your trusted contact if you do not arrive at your destination on time, or if your iPhone is not moving towards your destination. When you do arrive at your destination, Check In will let your trusted contact know.
- Time-Based: This option allows you to specify a time period for your Check In. If you do not check in within the specified time period, Check In will notify your trusted contact.
To set up a When I Arrive Check In, follow these steps:
- Tap When I Arrive.
- Enter your destination and specify how you are getting there.
- If you need extra time, tap the Add Extra Time button.
- Tap Share My Location.
- Tap the time period for your Check In.
- Tap Send.
To set up a Time-Based Check In, follow these steps:
- Tap Time-Based.
- Specify the time period for your Check In.
- Tap Share My Location.
- Tap Send.

Once you have set up a Check In, you can share it with your trusted contact by tapping the Send button. Your trusted contact will receive a notification that you have shared a Check In with them. They can tap on the notification to view your Check In information.
You can also edit your Check In information at any time by tapping the Edit button.
Here are some additional tips for using Check In:
- Make sure that both you and your trusted contact are using iOS 17.
- If you are checking in from a location that you do not want to share, you can tap the Hide My Location button.
- If you are checking in for a long period of time, you can tap the Extend Check In button to extend the time.
- If you need to cancel your check in, tap the Cancel Check In button.
Check In is a great way to stay safe and let your loved ones know where you are. It is easy to use and can be customized to meet your needs.
How to cancel a Check In
To cancel a Check In in iOS 17, follow these steps:
- Open the Messages app.
- Find the conversation with the Check In that you want to cancel.
- Tap the Check In message.
- Tap Details.
- Tap Cancel Check In.
- Tap Confirm.
Your Check In will be canceled and your trusted contact will be notified.
Here are some additional tips for canceling a Check In:
- You can only cancel a Check In if you have not yet reached your destination or if the time period for your Check In has not yet elapsed.
- If you are canceling a When I Arrive Check In, your trusted contact will receive a notification that you have canceled your Check In.
- If you are canceling a Time-Based Check In, your trusted contact will only receive a notification if you cancel your Check In before the time period for your Check In has elapsed.
How to modify Check In data
Sure, here is a longer version of your answer, avoiding repetition:
How to choose what details to share with Check In recipients in iOS 17
To choose what details to share with Check In recipients in iOS 17, follow these steps:
- Open the Settings app on your iPhone.
- Scroll down and tap Messages.
- Scroll down and tap Check In Data.
- Choose which details you want to share with Check In recipients:
- When I Arrive: Check In will share your current location, network signal strength, and iPhone and Apple Watch battery level if you select this option.
- Full: Check In will share all of the data above, along with the route your iPhone took and details about the last time you unlocked your phone or Apple Watch battery level if you select this option.
Once you have chosen which details you want to share, tap Done.
Here are some additional tips for choosing what details to share with Check In recipients:
- You can change your Check In Data settings at any time.
- If you are unsure which details to share, it is best to err on the side of caution and share less data.
- You can also choose to share different details with different Check In recipients. For example, you may want to share more details with your family members than you would with your friends.
I hope this is helpful!